How To: Setting up Touchpad on a Laptop – A Complete Guide — page 5
5. How to use the advanced feature of your Touchpad
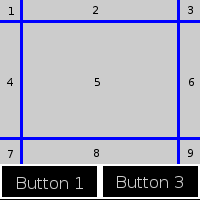 Here is a sketch of a basic touchpad (touchpad + left and right mouse button)
As you can see, there is 9 zones on your touchpad called:
- Left Edge (1,4,7)
- Right Edge (3,6,9)
- Top Edge (1,2,3)
- Bottom Edge (7,8,9)
Okie, now let’see what you can do with your touchpad. As before, you can move your mouse pointer around, but in addition, you can:
- Simple Click by tapping once the touchpad
- Double Click by tapping twice on the touchpad
- Right Click by tapping once around area 9 on the touchpad
- Middle Click by tapping once around area 3 on the touchpad
- Vertical Scrolling by moving your finger from area 3 to 9 for downward scrolling and area 9 to 3 for upward scrolling
- Horizontal scrolling by moving your finger on the touchpad from area 7 to 9 (scroll to the right) or 9 to 7 (scroll to the left)
- Dragging by tapping the touchpad once and then holding your finger on the touchpad and moving around
- Configure your touchpad during run-time by using synclient (this will be covered in another article), note that to enable this feature, you need to declare Option “SHMConfig” “on” in xorg.conf
Basically, you don’t need anymore the two buttons from the touchpad as you can do every action a full featured mouse will offer (but still, this is not as confortable to use as a real mouse is…. you definitely won’t play games with this ![]() ).
).
6. Conclusion
This tutorial went throught every step to get a fully operating touchpad with all features enable.
You might want to set parameters such as MinSpeed, MaxSpeed, AccelFactor … to your need and feeling but the default settings given should be fine for most users.
7. Links
- Synaptics Touchpad driver for Xorg/XFree86
- Qsynaptics : X11 touch pad driver configuration utility based on QT
- Gsynaptics : A GTK utility to configure your touchpad