How To: editing subtitles with subtitleeditor
In a previous article, I introduced gsubedit, a GNOME Subtitle Editor for linux using GTK. It was the best subtitles editor I’d ever found for linux.
Recently, I found a new project, that even it is quite young, has a lot to offer. Namely subtitleeditor. It supports any kind of subtitles format, allows you to move, change framerate and much more.
Here is an introduction to subtitleeditor.
Subtitleeditor is GTK+2 subtitle editor sofware released under the GNU General Public License (GPL), it makes subtitles editing really easy, in a few clicks you can create subtitles, change the framerate, move subtitles…
Here is the full list of featrues:
- Can create new subtitle
- Open and Save subtitle (SSA, ASS, SubRip (srt), MicroDvd (sub))
- Add, Delete subtitles entries
- FPS convertion
- Scale
- Find, Find and replace
- Check time and encoding errors
INSTALLING SUBTITLEEDITOR
If you are running ubuntu or debian, you can get the .deb package from the origibal site. And install it using:
$ sudo dpkg -i /path/to/subtitleeditor-0.7.2.deb
other people might compile it (check out that you have all the dependencies installed on your computer first).
nota: in order to build this package, you need to have automake-1.7 installed. Make sure that this version will be used by default. People running a debian system might use
$ sudo update-alternatives --config automake
and choose automake-1.7.
$ tar -xzvf subtitleeditor-0.7.2.tar.gz
$ cd subtitleeditor-0.7.2/
$ sudo ./autogen.sh && make && make install
After configuring, compiling and installing subtitleeditor, the binaries and other files should be installed in /usr/local/.
Now let’s try it out!
nota Through this article, anything between parentheses and in bold will denotate a key binding shortcut. ex: (Ctrl+N)
CREATING NEW SUBTITLES
First of all, launch subtitleeditor :):
$ subtitleeditor
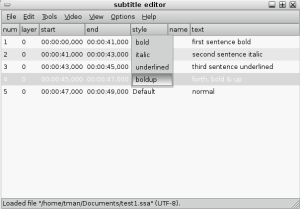
Once subtitle editor is opened, create a new subtitle file (Ctrl+N) and start creating a new entry (Insert). Then you can set the time the subtitle starts at, the time the subtitle stop at, a style and the text that has to be shown on screen.
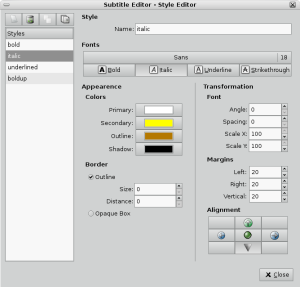
As you can see, there is a style column. This allows you to define the style the subtitles should be display with (bold, italic, red colored…). To create custom styles, click on Tools->Style Editor and then create a new style by clicking on the top left icon, give it a name, press enter and the define the style you want.
Now, you can use the predefined style from the main window, as shown below:
Then carry on insering new line with (Insert) if you want to insert it after the current selected line, or before the selected line using (Ctrl+Insert) and there you go :).
Once you are done, you can save and export the subtitles to:
- Formats using style: .ssa, .ass
- Formats not supporting style: .srt, .sub
Please, that’s it for now, I introduce subtitleeditor as being a great tool for creating subtitles. I will carry on later on to show you how to easily translate or resynchronise subtitles.
Cheerio